1 Sample

Easy CG

How to cut a hole in a mesh

A fantastic tutorial about 8 methods for cutting holes in a mesh !

It’s often necessary but not always easy to obtain a clean result. This video by Evermotion will give a great overview on different ways to achieve it.

How to create stairs in Blender

It’s not too complicated to generate a stairway with Blender. The idea is to model a step and use an array modifier after to multiply it.

I’m going to show you step by step (I’m so funny ! 😉 ) how to proceed.

First I had a quick look on the web to know the common dimensions of a step. You can of course adapt that at your needs.

  • Width : 80 cm
  • Depth : 27 cm
  • Height : 18 cm

Let’s start Blender and go straight in the Scene tab to change the units to metric.

stairs01

In edit mode, move the vertices of the default cube one meter up along the Z axis to have the origin point of the cube on the floor.

stairs02

Open the properties panel (N) and set the dimensions of the step. Don’t forget to apply the scale with Ctrl+A / Scale.

stairs03

In edit mode, add an horizontal loop cut and bring it near the top face.

stairs04

In face select mode, select the top face on the front and extrude along the Y axis a little bit.

stairs05

In edge select mode, select the top and bottom edges of the front face and create a bevel (Ctrl+B). Don’t go to strong on it though.

stairs06

In the Tool panel, increase the number of segments to 3 to make the bevel more curved.

stairs07

Now that we have a good looking step, we can multiply it ! Add an array modifier to the object and change the values at 0 for X, 1 for Z and between 0.9 and 1.0 for Y. Take a close side view to be sure that the value you use doesn’t leave a gap between the two steps.

stairs08

You just have to increase the count value in the modifier to generate your stairway.

stairs09

Bonus : How to curve it ?

You have to add a Bezier curve in top view. Go in edit mode and subdivide the curve (W) to add one more control point.

stairs10

Select your stairway array and add a curve modifier. In the Object field, select the Bezier curve. You may have to rotate the stairway though to obtain the desired result. In my case I rotated it 90° on the Z axis.

stairs11

Et voilà !

stairs12

After you have to texture it. The UV unwrapping is not too complicated though. You can even create a carpet running along the steps by adding two loopcuts on the step, selecting all the faces in the middle and duplicating them. Separate this selection to create a new object and with a solidify modifier, you can create a carpet over the steps.

stairs_curved01

Be careful when you choose the texture because you’ll have some deformation on the texture with the curve modifier. You can see it on the inner side, on the top of the steps.

Hope this quick tutorial will be a good start for you to create nice stairways.

And in this domain like many others, there’s no limit !

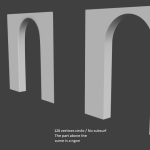
Adding an arch in a wall

Working with planes for walls is really convenient and easy. But sometimes, you need to have a curve and the arch is the perfect example.

Here is my test to cut a curved hole in a wall.

arch_smoothing

Update 08/01/2013 : Step by step to create the arch

We start with a simple plane.

blender_arch01

Add two vertical loop cuts and one horizontal.

blender_arch02

Delete the two faces in the middle choosing “Only Faces”.

blender_arch03

Delete two of the three left edges.

blender_arch04

Stay in edit mode and add a circle. Set “Fill Type” to nothing and choose an appropriate number of vertices (cf. my test result). Select half of the circle’s vertices and delete them.

blender_arch05

Move verticaly the points of the obtained curve (G Z) to position the arch. You might scale it also along the Z and X axis (S Z / S X). If you lost the selection on the half circle, you just need to select one vertex of it and press L.

blender_arch06

Switch to snap mode and select vertex.

blender_arch07

Move verticaly the half circle to snap it at the same Z position than the connection point of the plane.

blender_arch08

Resize it horizontaly to snap it to this connection point.

blender_arch09

Finally, select all the points in the middle, don’t forget to remove doubles and create a ngon by pressing F.

blender_arch10

It’s certainly not the best, most accurate, convenient method but you can obtain good results. I know that ngon are not ideal in modeling but in that particular case, it’s still ok to have one.

If you have a better method or a way to improve this one, don’t hesitate to share in the comments.